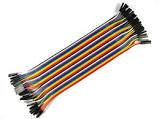
 Connecting Wires (Jumper Wires)
-
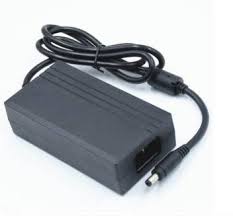 Power supply
 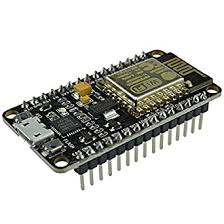 NodeMCU
 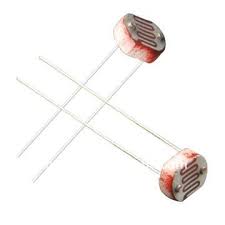 Photosensor
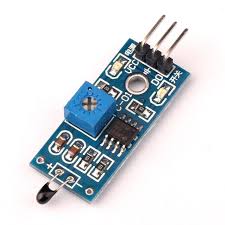 Thermal sensor(DHT-11)
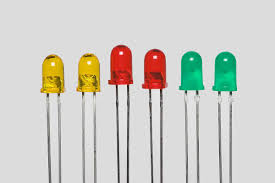 LED
LED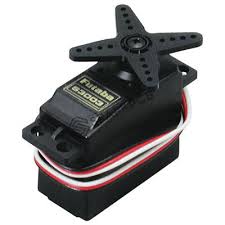 Servo motors
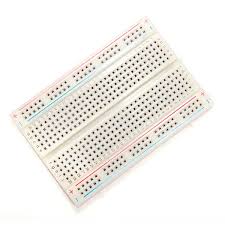 Bread board
 Smartphone
Home automation is building automation for home or smart home. A smart home controls many aspects of household appliances such as lighting, temperature control, entertainment systems etc. It is a way to reduce human efforts for maintaining an ambient state of tension free living where the appliances decide how to maintain their surroundings. However, the appliance themselves don’t decide what their output should be. This is done by the sensors and the controllers, which manipulate the data received from the sensors and a set of instructions fed into the controller decide what should happen. In an automated home it is also necessary to have some level of human interference so as to satisfy the needs of that person. Home automation aims at making life easier for us by taking care of our surroundings and helping us put more efforts into our work by saving time and being more efficient.
Generally, the line follower robot is one of the self-
operating mobile machines that follows a line drawn on the
floor. The path can be a visible black line on a white surface
(reverse).The basic operations of the line follower are as
follows:
• Capturing the line position with optical sensors
mounted at the front end of the robot. Most are using
several numbers of photo-reflectors. Therefore, the
line sensing process requires high resolution and
high robustness.
Generally, all the work is taken care of by the humans when comes to their homes, offices etc. Some of these works are not so complex and can be taken care by using machines. These lesser works include maintaining the light intensity, room
temperature, access, security and so on. Earlier when a person had to come home and set up the required appliances. But with home automation he can set up these appliances sitting far away just with the help of digital buttons on his/her
smartphone and a good WiFi connection.
These works are taken care by automating the surroundings.
Automation starts with gathering the required information from the surroundings such as intensity of light outside, temperature, individual access etc. by the use of sensors. These sensors are of various types such as photo sensor, temperature
and humidity sensor, PIR, touch sensor, finger-print sensor and so on. The data collected by these sensors is sent to the controller.
This controller contains set of instructions to gather this data, manipulate it and convert it into applicable data.
This data is the used by this controller to control the appliances such as lights, ACs, fans, door, windows, alarms etc.
Home automation or smart home has a large application in various fields such as it can be used for safety purposes,
in medical world, for security and many more things.
Home automation is an application of IOT which is taking up a lot of work in various fields such as security, safety,
commercial enterprises, etc.
Its scope can be estimated from lifting a spoon to wireless communication in space satellites(still under work).
The components used to build this line follower are as follows:
|
Connecting Wires (Jumper Wires) |
Power supply |
NodeMCU |
|
Photosensor |
Thermal sensor(DHT-11) |
LED |
|
Servo motors |
Bread board |
Smartphone |
Photosensor: Photosensor is used in our project to get the light intensity.
It is placed on the outside of the house to get the intensity of light in the surrounding.
Thermal sensor( DHT-11): Thermal sensor is used to get the temperature and humidity of the surrounding.
It is placed on the outside to gather information on the temperature and humidity for the appliances.
Controller (NodeMCU): NodeMCU is the main controller in the project. The data from the sensors (photosensor and DHT-11) will be given to Arduino and it gives corresponding signals to the LED and servo motors.
LED: The LED in the project is a representation of the LED bulbs used in homes. The LED is controlled by the signals sent by the controller depending on the data sent by the photosensor.
Servo Motor: The servo motor is used to control the window and curtain. The servo motor is controlled by the signals sent by the controller depending on the data sent by the photosensor and DHT-11 sensor or also by the smartphone.
Smartphone: Smartphone is used to control the state of the appliances as if they are to be kept on or off so that the energy is not wasted. It is also used to control the settings of the appliances according to the users needs.
Now, how it works?
When the switches are set to ‘on’ state on the smartphone, the sensors start to gather data and the controller uses this data to set the appliances to their respective states.
Let’s take when the switch for window is set on, both the sensors start reading data and when the required conditions in the instructions in controller are met the window turns to a particular angle. Now if the user wants to set it to some other
angle according to his/her need, the slider can be used to set the angle and stop the data from sensors to control it. Since the data from sensor is not being used there is no use to read the data from sensors. Hence, the sensors don’t read any
data for time being from the surroundings. Same thing works for the curtain.
Now, when switch for light is turned on by the smartphone.
The controller starts to read data from the photosensor and this data is manipulated to set the intensity of bulb inside.
To run this project, we have used Arduino IDE which is used to write the code and upload to the physical board. The Arduino language is merely a set of C/C++ functions that can be called from your code. Your sketch undergoes minor changes (e.g. automatic generation of function prototypes) and then is passed directly to a C/C++compiler.
The above code is used to just control the window by switching on the button on smartphone. The variable ‘buttonstate’ is used to store the state of the button and then data is read by both the sensors. This data is sent to NodeMCU which then uses the given conditions to operate the window. The commented lines of code can be used as test cases to check the code.
It can be seen that by switching on the button for a specific target appliance(let’s take light) the data from sensor takes care of the intensity that has to be maintained inside the room. It collects the intensity outside and sends it to the controller. The instruction in the controller converts this data into required input for the LED and thus the intensity of light is maintained in connection with the intensity outside. From the test cases we can note that there is reduction of human intervention as the settings are taken care by the sensors and controller. The person has to just switch it on and leave rest of the settings to the controller. Thus human effort is reduced and there is an ease of living where the person doesn’t have to worry about anything.
Thus home automation is a practical approach of IOT which can be implemented at a large scale. Its purpose need not be limited to the field of domestic use. The power of home automation can be seen on an enlarged basis by implementing smart offices and other such projects. The power of internet can be easily seen in this manner to control the lifestyle. It enhances interdisciplinary approach to mechanical, electronic, electrical and programming skills. The application of the project is range from the individual domestic appliance automation to control aspect of large industry to wireless communication in space vehicles. Human are intelligent natural machine but on contrary has serious limitation of efficiency and reliability. Robots are made to replace dependency of human force partially. The project is somehow designed to perform the similar task.
This project is a small representation of the power of IOT. Internet today has become a living source for life as most of the work is done using it. Internet is everywhere controlling our day-to-day lives. So why not put it to our complete use. This project shows how it can be used in hospitals to maintain uniform temperature according to the needs of a patient maintaining the state of consistency may reduce the need for interference and the professionals can decide how to set it up. This can be used for home security, prison security, offices etc. However, we are advancing in the field of making a great use of internet but still a far distance from it’s true power. This can make our world a completely different place, increasing the efficiency and saving time. Future holds great scope for home automation which can also depend on the meaning of home in future but we can hopefully say that one day we can make the great use of this power to eradicate the problems we have today.